Type the Word is a tool for typing through the Bible. It overlays what you have typed onto a passage of scripture, so that you can focus on typing accurately and the passage itself. It tracks what you have typed during the current session and in previous sessions allowing you to monitor your progress through larger passages of scripture.
I created Type the Word for myself and others who want to meditate on the Word of God while practicing their typing skill. I have found that typing through the Bible has been a great way to meditate on it.
Getting to start something fresh and build a tool I would be using was a great way to return to the basics. I scaffolded Type the Word as a Nextjs app with Create T3 App, and used the opportunity to try some new tech (TRPC, Drizzle, Vercel/OG, and PlanetScale). In the following sections, I’ll talk through the implementation details for Type the Word’s core features.
PassageSelector
The PassageSelector is two searchable combo boxes for selecting a passage by book and chapter.
I considered making this a composite widget so that you could navigate between inputs via the arrow keys and submit from either via Enter .
But there isn’t a general composite aria-role, so I decided to keep the inputs separate and add custom focus behavior.
Behavior 1: When a book is selected the chapter combo box is auto-focused.
Behavior 2: When only selecting a book the passage selection auto-submits after a delay.
And then finally the passage selector syncs with the URL.
Here is a Github link to the PassageSelector.
Verse rendering
Each Passage is rendered with the assumption that you can only have one verse being typed at a time.
This verse is rendered in the CurrentVerse component, which tracks a list of keystrokes you have typed and uses a reduce to create a typed version of the verse.
This typed version is compared to the correct version letter by letter to give you live feedback on the accuracy of your typing.
This list of keystrokes is held in a Jotai atom that is only read from the CurrentVerse component so that only the CurrentVerse rerenders onInput.
This ensures that typing through verses is performant on Psalm 119 — the longest chapter in the Bible.
I used onInput, because onKeyDown.key wasn’t working on Android mobile Chrome.
According to the current canIUse the latest version does support this field, but there were no previously reported versions that supported it.
Related issues one and two.
Keyboard Accessibility
Verses are rendered as inline elements. Adding interactivity to inline elements is tricky because there are uninteractive gaps between the text.
Here is an example: try hovering these verses and you’ll only see the pointer on the gray regions of text.
Something else I cared about was making it obvious what clicking on different verses would do.
A verse's text doesn't necessarily indicate that “clicking here switches to this verse.”
I could have added aria-labels, but I also wanted to make it obvious for mouse users.
To fix both problems I overlayed buttons on top of each verse.
Positioning these buttons was tricky so in the next few demos I’ll walk through the different approaches I tried.
Initially, I tried adding relative to the span wrapping each verse, and made each button absolute inset.
Unfortunately, when inline elements wrap so that their horizontal end is to the left of their horizontal start then the inset absolute elements has a width of 0.
absolute inset.Try resizing ^ to see what absolute positioning looks like in an inline element.
Next, I tried using the width of the parent on each button in combination with absolute top-0 left-0.
This way our button never collapses to a width of zero.
absolute top-0 left-0 with width based on the bounding box of the Passage.I found that even if you have the width of the parent, there is no way to center the button without tracking each verse's position relative to the parent.
I needed to position the button with width relative to the Passage and the top relative to the verse.
So I
- moved the
relativeclass from the verse to thePassagelevel - made the buttons
absoluterelative to the entirePassage - and calculated the
topposition by subtracting thePassage’stopfrom the verse’stop.
Here is a simplified version:
import { useRef } from 'react'
import { StartVerses } from './startVerses'
import { EndVerses } from './endVerses'
import { useRect } from './useRect'

export default function App() {
    const passageRef = useRef<HTMLDivElement>(null)
    const verseRef = useRef<HTMLDivElement>(null)
    const passageRect = useRect(passageRef)
    const verseRect = useRect(verseRef)
    return (
        <div className="p-5">
            <div
                className="relative overflow-auto resize border-2 border-gray-600 bg-white text-black p-3"
                ref={passageRef}
            >
                <div>
                    <StartVerses />

                    {/* To get "resize" working I am using ResizeObserver in
                        "useRect" instead of just listening to the resize event.
                        But inline elements don't trigger ResizeOberserver
                        except when they are added/removed to the DOM.
                        This hack ("key={Math.random()"} is just for this
                        example to enable the resizable corner button. */}
                    <span key={Math.random()} ref={verseRef}>
                        4 Mollit eu mollit voluptate.
                    </span>

                    <EndVerses />
                </div>
                {verseRect && passageRect && (
                    <button
                        className="absolute text-black border-2 border-black backdrop-blur-sm bg-white/80 flex justify-center items-center"
                        style={{
                            top: verseRect.top - passageRect.top - 8,
                            left: 4,
                            width: passageRect.width - 12,
                            height: verseRect.height + 16,
                        }}
                    >
                        Click here
                    </button>
                )}
            </div>
        </div>
    )
}
Auto Scroll
Once you have selected a verse it auto-scrolls to position the verse close to the top of your screen, this allows you to continuously type through long passages.
Most verses are rendered with ReadonlyVerse.
When you select a new verse it is rerendered this verse as the CurrentVerse.
CurrentVerse is similar to ReadonlyVerse except it contains a hidden input to contain state, and an “anchor” element which I’ll explain shortly.
For reference: here is a simplified diff from ReadonlyVerse to CurrentVerse, keep scrolling as I'll explain this line by line below.
export function CurrentVerse({setCurrentVerse, resetState}: {setCurrentVerse: () => void, resetState: () => void}) {
    const inputRef = useRef<HTMLInputElement>(null)
    const [passageId] = useAtom(passageIdAtom)

    return (
        <span
            onClick={() => {
-                setCurrentVerse()
-                resetState()
            }}
            ref={ref}
        >
+            <span
+                id={`${passageId}-scroll-anchor`}
+                className={
+                    'inline-block -translate-y-[300px] lg:-translate-y-[330px]'
+                }
+            />

            {verse.nodes.map((atom, aIndexPrime) => {
               /* rendering logic */
            })}

            {rect && passageRect && !isArenaFocused ? (
-                <button onClick={() => inputRef.focus()}>
-                    <span>Switch to {verse.verse.value}</span>
+                <button onClick={() => inputRef.focus()}>
+                    <span>Continue typing verse {verse.verse.value}</span>
                </button>
            ) : null}

+            <input
+                type="text"
+                className="peer fixed h-0 max-h-0 opacity-0"
+                onInput={handleInput}
+                tabIndex={-1}
+                onFocus={() => {
+                    document
+                        .getElementById(`${passageId}-scroll-anchor`)
+                        ?.scrollIntoView({
+                            block: 'start',
+                            behavior: 'smooth',
+                        })
+                }}
+                ref={inputRef}
+                autoFocus={true}
+            />
        </span>
    )
}-
Clicking on a
ReadonlyVersesets that verse to be current in the global state.- setCurrentVerse() - resetState() -
That verse is rendered as the
CurrentVersewhich contains an<input autofocus={true} /> -
Autofocus triggers the
onFocuswhich then gets the position of the anchor element${passageId}-scroll-anchorand scrolls to it withscrollIntoView.+ onFocus={() => { + document + .getElementById(`${passageId}-scroll-anchor`) + ?.scrollIntoView({ + block: 'start', + behavior: 'smooth', + }) + }} -
scrollIntoViewdoesn’t support adding an offset. But we can add one, by scrolling to the anchor element, which is absolutely positioned above theCurrentVerse.+ <span + id={`${passageId}-scroll-anchor`} + className={ + 'inline-block -translate-y-[300px] lg:-translate-y-[330px]' + } + />The anchor is positioned exactly the distance of the navigation +
PassageSelector, so navigating to and from a passage doesn’t trigger a scroll. -
This anchor is only rendered in the
CurrentVerseand is scoped withuseIdat thePassagelevel so that you can have multiple passages on the same page.
Here is a Github link to CurrentVerse.
Cursor animation
The CurrentVerse renders your letters comparing the typed version to the correct version and adding classes to each letter to indicate correctness.
For example, if a user types:

The markup will look like this:
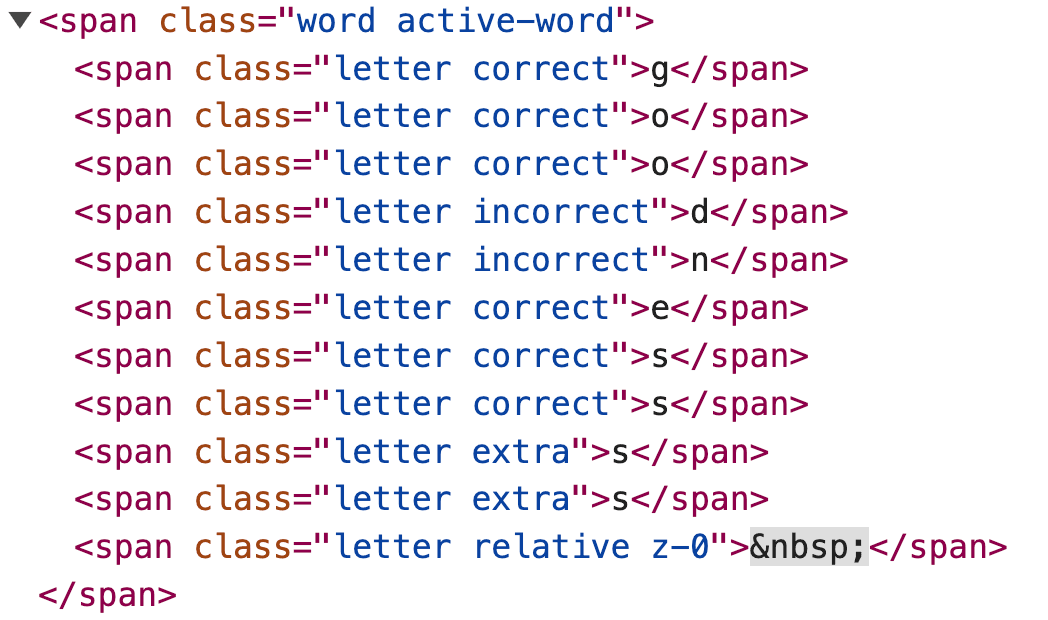
The Cursor is an animated element that uses these classes to position itself after the last typed letter.
-
First thing to notice is that I am using
requestAnimationFrameto potentially animate the cursor every frame.export function useCursor(passageId: string): void { /* ... */ useEffect(() => { function move() { /* ... */ } let frame = requestAnimationFrame(function loop() { frame = requestAnimationFrame(loop) move() }) return () => { cancelAnimationFrame(frame) } }, [passageId]) }This means there is a bit of CPU work on every frame and the animation can't just be handed over to the GPU (hardware-acceleration). This is kinda a bummer, because I am animating transforms only and using the WAAPI via motion one, so the other parts of my animation are acceleratable.
But at the same time I think this sort of interactive dynamic animation will be the last type of animation that can be hardware-accelerated.
I learned alot about hardware accelerated animation in my previous write up on sidebar animation performance. Check it out if you want to learn more.
-
Within
moveI find the position of the next letter to type and get it's bounding box:let activeElement = document.querySelector( `#${CSS.escape( passageId, )} .active-verse .active-word:not(.error) .letter:not(.correct):not(.incorrect):not(.extra)`, ) let activeRect = activeElement?.getBoundingClientRect()Then I get the same info on the related
Passage.const passage = document.querySelector(`#${CSS.escape(passageId)}`) const passageRect = passage?.getBoundingClientRect()And subtract the
leftandtopof the letter from theleftandtopof thePassage. This gives meleftandtopof my cursor relative thePassageitself.const nextTop = activeRect.top - passageRect.top const nextLeft = activeRect.left - passageRect.leftI then animate the cursor like so:
animate(
  `#${CSS.escape(passageId)}-cursor`,
  {
    top: 0,
    left: 0,
    x: `${nextLeft}px`,
    y: `${nextTop}px`,
    width: `2px`,
    height: '22px',
  },
  {
    easing: [0.25, 0.46, 0.45, 0.94],
    duration: distance > 30 ? 0 : 0.085,
  },
)
That's the gist of how the cursor is animated but there are two optimizations:
-
At this rate,
animateis called up to 60 times a second, and a lot of animations will be cancelled.We should really only call
animatewhen there is a change in position. So I track previous position, and add an early return tomovefor when the position hasn't changed.const prev = useRef<{ top: number; left: number }>({ top: 0, left: 0 }) useEffect(() => { function move() { /* get DomRects */ const nextTop = activeRect.top - passageRect.top const nextLeft = activeRect.left - passageRect.left if (nextTop === prev.current.top && nextLeft === prev.current.left) return prev.current = { top: nextTop, left: nextLeft, } /* animate */ } }, [passageId]) -
When the cursor animated over long distances it felt unpolished to me. So the other optimization, is not animating when the difference in position is over
30px. I used pythagorean theorem to find the distance between two points. And when the distance was over30pxI set thedurationof my animation to0.useEffect(() => { function move() { /* get DomRects */ /* diff with previous */ const distance = pythagorean( prev.current.left ?? 0, nextLeft, prev.current.top ?? 0, nextTop, ) animate( /* ... */, { easing: [0.25, 0.46, 0.45, 0.94], duration: distance > 30 ? 0 : 0.085, }, ) } }, [passageId])It's the little things. Here is a before and after.
Before:
After:
Here is a Github link
to useCursor.
Hope you enjoyed this breakdown and give Type the Word a try. If you know someone that studies the Bible, it would mean a lot if you shared it with them.
Until next time 👋
Links
- Github
- Type the Word
- Why I created Type the Word
- The typing feedback UX is a copy of monkeytype.com.