Welcome back 👋
This post is the second in a series on building a treeview component from scratch. In part 1 we created a mouse interactive treeview component, and here we are adding keyboard navigation and accessibility.
In this post, we will
- Introduce the ARIA treeview pattern
- Integrate our roving tabindex abstraction
- Create keyboard shortcuts
- And add the ARIA attributes for accessibility.
By the end we will have a keyboard interactive treeview:
import { useState } from "react";

import { Treeview } from "./treeview"
import { data } from "./data"

export default function App() {
    const [selected, select] = useState<string | null>(null)
    return (
        <Treeview.Root
            value={selected}
            onChange={select}
            className="w-72 h-full border-[1.5px] border-slate-200 m-4"
        >
            {data.map(node => (
                <Treeview.Node node={node} key={node.id} />
            ))}
        </Treeview.Root>
    )
}
Treeview ARIA pattern
This post is based on the treeview pattern from the ARIA Authoring Practices Guide website. They have created a list of patterns that's helpful when you find yourself creating widgets from scratch.
Adding a roving tabindex
Let's integrate our roving tabindex into our current treeview.
RovingTabindexRootis a context provider for- holding the focusable state
- handling some edge cases
useRovingTabindexis a prop getter hook for- registering DOM elements that are focusable
- controlling your tabindex value
RovingTabindexRoot
In the Root component, we can integrate RovingTabindexRoot using the as property to maintain the same DOM structure.
export function Root({ children, className, value, onChange }: RootProps) {
    const [open, dispatch] = useReducer(
        treeviewReducer,
        new Map<string, boolean>(),
    )

    return (
        <TreeViewContext.Provider
            value={{
                open,
                dispatch,
                selectedId: value,
                selectId: onChange,
            }}
        >
-            <ul className={clsx('flex flex-col overflow-auto', className)}>{children}</ul>
+            <RovingTabindexRoot
+                as="ul"
+                className={clsx('flex flex-col overflow-auto', className)}
+            >
                {children}
            </RovingTabindexRoot>
        </TreeViewContext.Provider>
    )
}
useRovingTabindex
Then in our Node component, we can integrate useRovingTabindex.
export const Node = function TreeNode({
    node: { id, children, name },
}: NodeProps) {
    const { open, dispatch, selectId, selectedId } = useContext(TreeViewContext)
+    const { getRovingProps, getOrderedItems } = useRovingTabindex(id)
    const isOpen = open.get(id)
    return (
        <li
-            className="flex flex-col cursor-pointer select-none"
+            {...getRovingProps<'li'>({
+                className: 'flex flex-col cursor-pointer select-none',
+                onKeyDown: function (e: KeyboardEvent) {
+                    const items = getOrderedItems()
+                    console.log(items)
+                },
+            })}
        >
            <div
                className={clsx(
                    'flex items-center space-x-2 font-mono font-medium rounded-sm px-1 ',
                    selectedId === id ? 'bg-slate-200' : 'bg-transparent',
                )}
                onClick={() => {
                    isOpen
                        ? dispatch({
                              id: id,
                              type: TreeViewActionTypes.CLOSE,
                          })
                        : dispatch({
                              id: id,
                              type: TreeViewActionTypes.OPEN,
                          })
                    selectId(id)
                }}
            >

/* ... */
-
We move our existing props into the prop getter so that it can compose them
-   className="flex flex-col cursor-pointer select-none"
+   {...getRovingProps<'li'>({
+       className: 'flex flex-col cursor-pointer select-none',
This prevents props specified in our prop getter from being clobbered by the props we were passing to the li directly.
-
We create a
onKeyDownto see whatgetOrderedItemsreturns+ onKeyDown: function (e: KeyboardEvent) { + const items = getOrderedItems() + console.log(items) + },
import { useState } from "react";

import { Treeview } from "./treeview"
import { data } from "./data"

export default function App() {
    const [selected, select] = useState<string | null>(null)
    return (
        <Treeview.Root
            value={selected}
            onChange={select}
            className="w-72 h-full border-[1.5px] border-slate-200 m-4"
        >
            {data.map(node => (
                <Treeview.Node node={node} key={node.id} />
            ))}
        </Treeview.Root>
    )
}
If you focus on a Node in this demo, hit a key on your keyboard, and look at the devtools console you will see a list like this one:
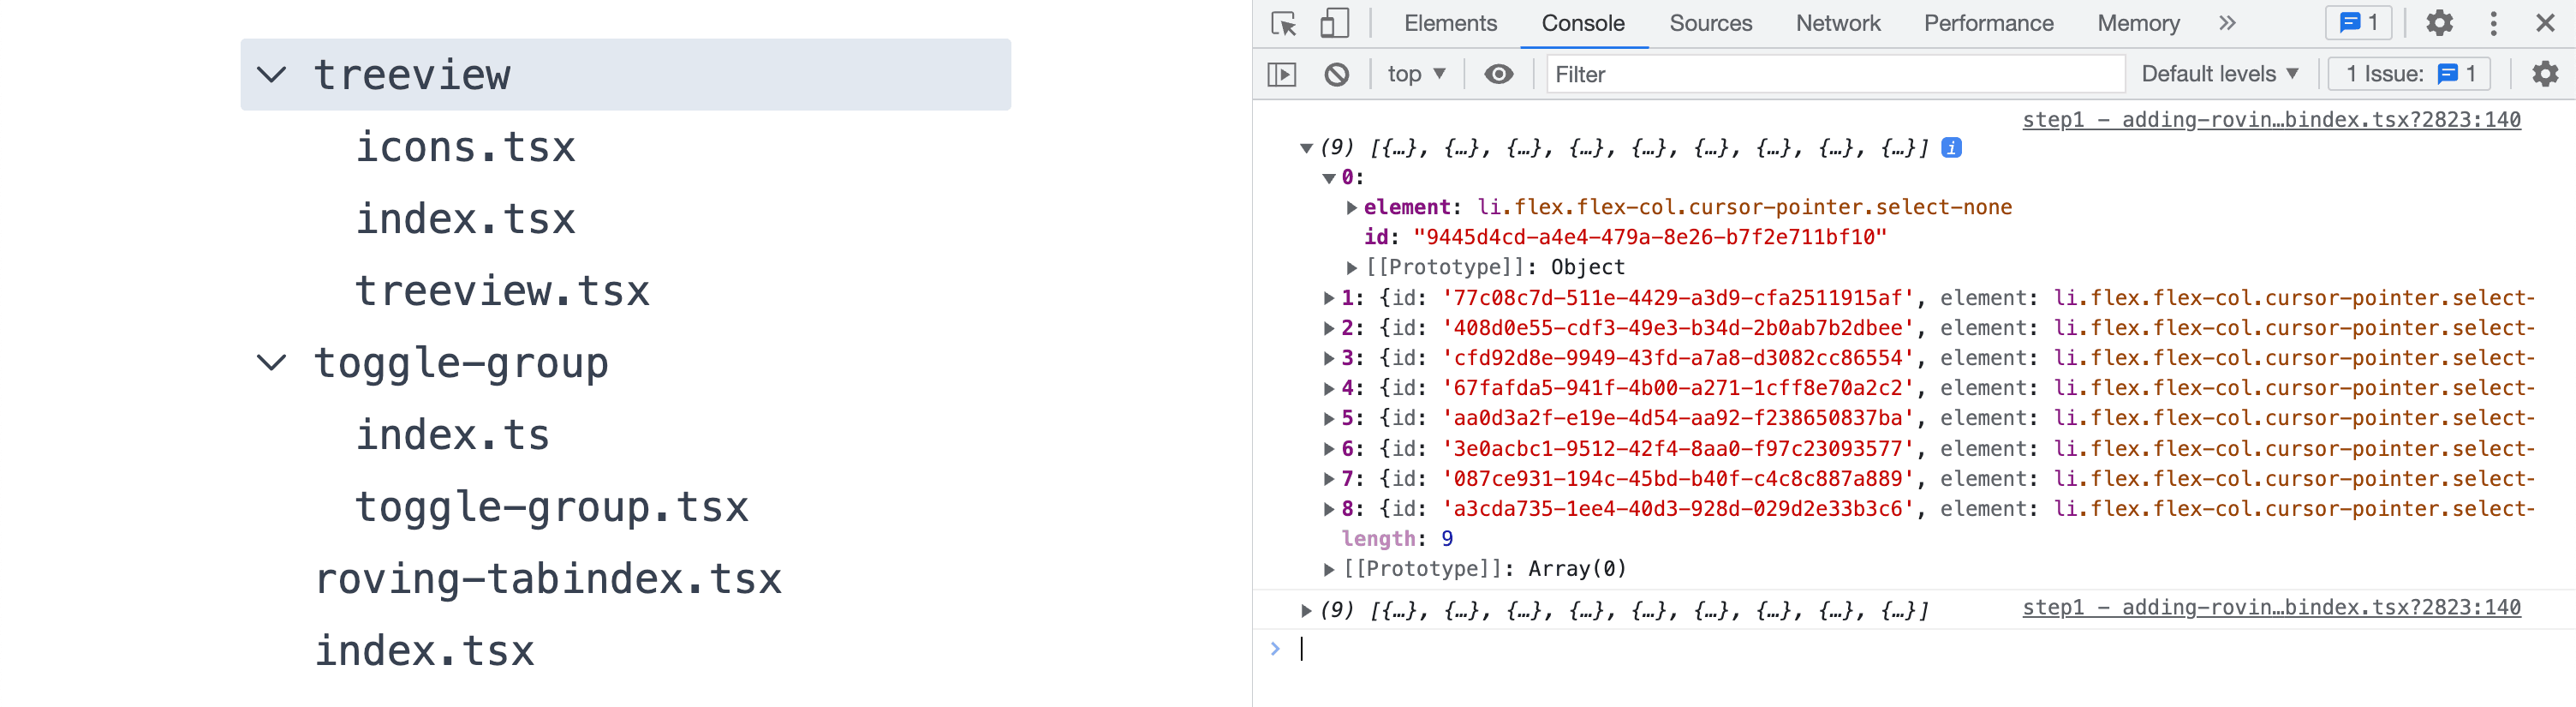
In the next, section we will use this list of items to create our shortcuts by iterating based on which element is currently focused.
What is getOrderedItems doing?
Let's say you are an event in an onKeyDown handler. How do you know what element to focus next?
getOrderedItems is great for answering this question.
const elements = useRef(new Map<string, HTMLElement>())
const ref = useRef<HTMLDivElement | null>(null)

function getOrderedItems() {
  const elementsFromDOM = Array.from(
    ref.current.querySelectorAll<HTMLElement>('[data-item]'),
  )

  return Array.from(elements.current)
    .sort(
      (a, b) => elementsFromDOM.indexOf(a[1]) - elementsFromDOM.indexOf(b[1]),
    )
    .map(([id, element]) => ({ id, element }))
}-
It queries the DOM for all the DOM nodes that are registered with our roving tabindex
const elementsFromDOM = Array.from( ref.current.querySelectorAll<HTMLElement>('[data-item]'), ) -
And creates a list of sorted
{id, element}pairs.
Then back in the onKeyDown we can use this array of pairs to
-
find our current position
const currIndex = orderedItems.findIndex(item => item.id === id) -
and from that find the
nextelement.return orderedItems.at( currIndex === orderedItems.length - 1 ? 0 : currIndex + 1, )
Keyboard navigation
Let's use this list of items to create the 7 keyboard shortcuts in the onKeyDown of our Node.
This section is based on the Keyboard interaction section of ARIA authoring practice doc.
Up / Down
onKeyDown: function (e: KeyboardEvent) {
+    e.stopPropagation()
+
     const items = getOrderedItems()
-    console.log(items)


+    let nextItemToFocus: RovingTabindexItem | undefined

+    if (isHotkey('up', e)) {
+        e.preventDefault()
+        nextItemToFocus = getPrevFocusableId(items, id)
+    } else if (isHotkey('down', e)) {
+        e.preventDefault()
+        nextItemToFocus = getNextFocusableId(items, id)
+    }
+
+    nextItemToFocus?.element.focus()
}-
We use the
getPrevFocusableIdandgetNextFocusableIdto get these get previous and next items.These selectors are similar to the example in the previous section.
A full explanation can be found in "React roving tabindex"
-
We create a group of if statements for checking event type, calling its selector, and assigning the returned value to
nextItemToFocuslet nextItemToFocus: RovingTabindexItem | undefined if (isHotkey('up', e)) { // } else if (isHotkey('down', e)) { // } nextItemToFocus?.element.focus()We then optionally chain
.focus(). -
We
e.preventDefault()for up and down to prevent the default scroll behavior. -
We
e.stropPropagation()for all events bubbling. Without this, you can't move into nested nodes.This is important because we are rendering
Nodes withinNodes.
import { useState } from "react";

import { Treeview } from "./treeview"
import { data } from "./data"

export default function App() {
    const [selected, select] = useState<string | null>(null)
    return (
        <Treeview.Root
            value={selected}
            onChange={select}
            className="w-72 h-full border-[1.5px] border-slate-200 m-4"
        >
            {data.map(node => (
                <Treeview.Node node={node} key={node.id} />
            ))}
        </Treeview.Root>
    )
}
Right / Left
else if (isHotkey('right', e)) {
    if (isOpen && children?.length) {
        nextItemToFocus = getNextFocusableId(items, id)
    } else {
        dispatch({ type: TreeViewActionTypes.OPEN, id })
    }
}-
If our Node is closed then
Rightopens it.dispatch({ type: TreeViewActionTypes.OPEN, id }) -
If our Node is open and has children, then
Rightmoves to the first child.nextItemToFocus = getNextFocusableId(items, id)
Left is a bit trickier
else if (isHotkey('left', e)) {
    if (isOpen && children?.length) {
        dispatch({
            type: TreeViewActionTypes.CLOSE,
            id,
        })
    } else {
        nextItemToFocus = getParentFocusableId(items, id)
    }
}-
If our
Nodeis open thenLeftcloses it.dispatch({ type: TreeViewActionTypes.CLOSE, id }) -
But if our
Nodeis closedLeftmoves focus to the parentNode.nextItemToFocus = getParentFocusableId(items, id)
This is the one selector that getOrderedItems doesn't cover.
From the list of items returned, there isn't an easy way to know which item belongs to the parent Node.
Thankfully HTMLElements have a parentElement property that we can use to traverse up the layers of our tree.
But first, I want to use a data attribute so we can identify the root of our tree as a base case in our traversal.
We modify our RovingTabindexRoot to use this attribute.
    <Component
        {...props}
        ref={ref}
        tabIndex={isShiftTabbing ? -1 : 0}
+        data-root
Then we can create getParentFocusableId to traverse up our tree:
export function getParentFocusableId(
  orderedItems: RovingTabindexItem[],
  id: string,
): RovingTabindexItem | undefined {
  const currentElement = orderedItems.find(item => item.id === id)?.element

  if (currentElement == null) return

  let possibleParent = currentElement.parentElement

  while (
    possibleParent !== null &&
    possibleParent.getAttribute('data-item') === null &&
    possibleParent.getAttribute('data-root') === null
  ) {
    possibleParent = possibleParent?.parentElement ?? null
  }

  return orderedItems.find(item => item.element === possibleParent)
}-
We get the currently focus element from our "orderedItems"
const currentElement = orderedItems.find(item => item.id === id)?.element -
We traverse the
.parentElementproperty until we find a parent node(data-item), the root node(data-root), or the document root(possibleParent !== null)let possibleParent = currentElement.parentElement while ( possibleParent !== null && possibleParent.getAttribute('data-item') === null && possibleParent.getAttribute('data-root') === null ) { possibleParent = possibleParent?.parentElement ?? null } -
Then we return the related item
return orderedItems.find(item => item.element === possibleParent)
Here is our onKeyDown so far:
onKeyDown: function (e: KeyboardEvent) {
    e.stopPropagation()

    const items = getOrderedItems()
    let nextItemToFocus: RovingTabindexItem | undefined

    if (isHotkey('up', e)) { /* ... */ }
    else if (isHotkey('down', e)) { /* ... */ }
+    else if (isHotkey('right', e)) {
+        if (isOpen && children?.length) {
+            nextItemToFocus = getNextFocusableId(items, id)
+        } else {
+            dispatch({ type: TreeViewActionTypes.OPEN, id })
+        }
+    }
+    else if (isHotkey('left', e)) {
+        if (isOpen && children?.length) {
+            dispatch({ type: TreeViewActionTypes.CLOSE, id })
+        } else {
+            nextItemToFocus = getParentFocusableId(items, id)
+        }
+    }

    nextItemToFocus?.element.focus()
}import { useState } from "react"; import { Treeview } from "./treeview" import { data } from "./data" export default function App() { const [selected, select] = useState<string | null>(null) return ( <Treeview.Root value={selected} onChange={select} className="w-72 h-full border-[1.5px] border-slate-200 m-4" > {data.map(node => ( <Treeview.Node node={node} key={node.id} /> ))} </Treeview.Root> ) }
Style
At this point, we are using the default focus ring, which is causing the entire Node and its children to look focused.
Let's replace this outline with a border-based focus indicator.
export const Node = function TreeNode({
node: { id, children, name },
}: NodeProps) {
/* ... */
const { isFocusable, getRovingProps, getOrderedItems } = useRovingTabindex(id)
return (
<li
{...getRovingProps<'li'>({
- className: 'flex flex-col cursor-pointer select-none',
+ className: 'flex flex-col cursor-pointer select-none focus:outline-none group',
onKeyDown: function (e: KeyboardEvent) {
/* ... */
},
})}
>
<div
className={clsx(
- 'flex items-center space-x-2 font-mono font-medium rounded-sm px-1',
+ 'flex items-center space-x-2 font-mono font-medium rounded-sm px-1 border-[1.5px] border-transparent',
+ isFocusable && 'group-focus:border-slate-500',
selectedId === id ? 'bg-slate-200' : 'bg-transparent',
)}
onClick={() => {
/* ... */
}}
>
{/* ... */}
</li>
)
}-
We add
focus:outline-noneto remove the default outline -
We add a
groupclass to the li andgroup-focus:border-slate-500to the div, so that when the li is focused its corresponding div is highlighted -
We conditionally render
isFocusable && 'group-focus:border-slate-500'to prevent childrenNodes from having a border.Note that I don't have to toggle border classes here because
group-focus:automatically gives me a higher specificity than -
We add a default transparent border
border-[1.5px] border-transparentto prevent layout shifts on focus
Try undoing any of these parts to see how they interact.
import { useState } from "react";

import { Treeview } from "./treeview"
import { data } from "./data"

export default function App() {
    const [selected, select] = useState<string | null>(null)
    return (
        <Treeview.Root
            value={selected}
            onChange={select}
            className="w-72 h-full border-[1.5px] border-slate-200 m-4"
        >
            {data.map(node => (
                <Treeview.Node node={node} key={node.id} />
            ))}
        </Treeview.Root>
    )
}
Fullwidth style
One pretty common way of styling selection/focus is to have it take the entire width of the treeview.
Doing this type of selection is tricky with the setup we have created.
In part 1 we created our Node to recursively render Nodes like so:
<ul className="pl-4">
{children.map(node => (
<Node node={node} key={node.id} />
))}
</ul>This makes the left keybinding easier because we can get the parentElement from the DOM, but it also prevents us from easily creating a full-width selection UI.
We could remove this (^) nested structure, but we
- would need a new way of getting the parentElement and
- would need to track each
Node's depth in the tree to dynamically add padding / create hierarchy.
Something else I tried is keeping the nested structure, and just absolutely positioning the selection indicator.
This doesn't work because I need the left and right properties from my Root component and I need the top and bottom properties from my Node.
Sure I could add a ref and getBoundingClient rect, but one of the hopes of this example was to keep things simple.
For now, I am content with this limitation of the current setup. I just wanted to bring it up in case that was the focus style you are going for.
Home / End
Home and End are quite easy.
onKeyDown: function (e: KeyboardEvent) {
e.stopPropagation()
const items = getOrderedItems()
let nextItemToFocus: RovingTabindexItem | undefined
if (isHotkey('up', e)) { /* ... */ }
else if (isHotkey('down', e)) { /* ... */ }
else if (isHotkey('left', e)) { /* ... */ }
else if (isHotkey('right', e)) { /* ... */ }
+ else if (isHotkey('home', e)) {
+ e.preventDefault()
+ nextItemToFocus = getFirstFocusableId(items)
+ } else if (isHotkey('end', e)) {
+ e.preventDefault()
+ nextItemToFocus = getLastFocusableId(items)
+ }
nextItemToFocus?.element.focus()
}We just need to create the new selectors in our roving-tabindex.tsx file.
export function getFirstFocusableId(
orderedItems: RovingTabindexItem[],
): RovingTabindexItem | undefined {
return orderedItems.at(0)
}
export function getLastFocusableId(
orderedItems: RovingTabindexItem[],
): RovingTabindexItem | undefined {
return orderedItems.at(-1)
}- We use
.at()to safely access the first and last properties of our ordered items - We
e.preventDefault()in theonKeyDownto prevent default scrolling scrolling behavior.
import { useState } from "react";

import { Treeview } from "./treeview"
import { data } from "./data"

export default function App() {
    const [selected, select] = useState<string | null>(null)
    return (
        <Treeview.Root
            value={selected}
            onChange={select}
            className="w-72 h-full border-[1.5px] border-slate-200 m-4"
        >
            {data.map(node => (
                <Treeview.Node node={node} key={node.id} />
            ))}
        </Treeview.Root>
    )
}
Typeahead
A typeahead listens to text input and moves focus to the next matching Node.
onKeyDown: function (e: KeyboardEvent) {
e.stopPropagation()
const items = getOrderedItems()
let nextItemToFocus: RovingTabindexItem | undefined
if (isHotkey('up', e)) { /* ... */ }
else if (isHotkey('down', e)) { /* ... */ }
else if (isHotkey('left', e)) { /* ... */ }
else if (isHotkey('right', e)) { /* ... */ }
else if (isHotkey('home', e)) { /* ... */ }
else if (isHotkey('end', e)) { /* ... */ }
+ else if (/^[a-z]$/i.test(e.key)) {
+ nextItemToFocus = getNextFocusableIdByTypeahead(
+ items,
+ id,
+ e.key,
+ )
+ }
nextItemToFocus?.element.focus()
}We test e.key against a regular expression containing all letters and use /i to make it case insensitive.
if (/^[a-z]$/i.test(e.key))For getNextFocusableIdByTypeahead:
function wrapArray<T>(array: T[], startIndex: number) {
return array.map((_, index) => array[(startIndex + index) % array.length])
}
export function getNextFocusableIdByTypeahead(
items: RovingTabindexItem[],
id: string,
keyPressed: string,
) {
const currentIndex = items.findIndex(item => item.id === id)
const wrappedItems = wrapArray(items, currentIndex)
let index = 0,
typeaheadMatchItem: RovingTabindexItem | undefined
while (index < wrappedItems.length - 1 && typeaheadMatchItem == null) {
const nextItem = wrappedItems.at(index + 1)
if (
nextItem?.element?.textContent?.charAt(0).toLowerCase() ===
keyPressed.charAt(0).toLowerCase()
) {
typeaheadMatchItem = nextItem
}
index++
}
return typeaheadMatchItem
}-
We create
wrapArray.function wrapArray<T>(array: T[], startIndex: number) { return array.map( (_, index) => array[(startIndex + index) % array.length], ) }wrapArraychanges the starting point of your array to a specific index.const array = [1, 2, 3] console.log(wrapArray(array, 0)) // [1, 2, 3] console.log(wrapArray(array, 1)) // [2, 3, 1] console.log(wrapArray(array, 2)) // [3, 1, 2]We want to go through
itemsonce, in order, starting at a specific index. WithwrapArraywe can change ouritemsstarting point to the currently focusedNode. From there we can loop throughitemswithout handling the0anditem.lengthcases.Note: this is a c/p from Radix source.
-
We iterate through our items stopping only if we find a match
while (index < wrappedItems.length - 1 && typeaheadMatchItem == null) { -
We match based on the first letter of each element's name
if ( nextItem?.element?.textContent?.charAt(0).toLowerCase() === keyPressed.charAt(0).toLowerCase() ) { typeaheadMatchItem = nextItem } -
And when we find a match we return from our selector.
import { useState } from "react";

import { Treeview } from "./treeview"
import { data } from "./data"

export default function App() {
    const [selected, select] = useState<string | null>(null)
    return (
        <Treeview.Root
            value={selected}
            onChange={select}
            className="w-72 h-full border-[1.5px] border-slate-200 m-4"
        >
            {data.map(node => (
                <Treeview.Node node={node} key={node.id} />
            ))}
        </Treeview.Root>
    )
}
Focus types
The ARIA authoring practice guide walks through "widgets"(Radix calls these "primitives"). I think this subset of components is defined by being small, reusable, and not containing business logic.
When widgets have multiple interactive controls, there are keybindings for controlling "sub-focus" within them. These keybindings can be broken down into types.
-
Distinct focus and selection
-
Selection follows focus
Since we have already implemented the keybindings for focus, we can implement distinct focus and selection to our treeview by triggering selection on Space.
+ else if (isHotkey('space', e)) {
+ e.preventDefault()
+ selectId(id)
+ }If instead, we want to implement selection follows focus, the diff would look something like this:
- nextItemToFocus?.element.focus()
+ if (nextItemToFocus != null) {
+ nextItemToFocus.element.focus()
+ selectId(nextItemToFocus.id)
+ }Both types are valid for the treeview pattern, but most other patterns specify which focus type they should use. In our treeview, I am thinking about it like a file manager. When nodes are selected there will likely be a network request fetching the details of the new selection. Distinct focus and selection will prevent flickering as you navigate through the treeview.
I found this post on designing keyboard interfaces well worth the read.
ARIA
Now that our example is keyboard accessible let add ARIA attributes to make it usable with a screen reader. The ARIA authoring practices guide details which attributes are required in this section.
Root
type RootProps = {
children: ReactNode | ReactNode[]
className?: string
value: string | null
onChange: (id: string) => void
+ label: string
}
-export function Root({/* ... */}: RootProps) {
+export function Root({/* ... */, label}: RootProps) {
/* ... */
return (
<TreeViewContext.Provider
value={{ /* ... */ }}
>
<RovingTabindexRoot
as="ul"
className={clsx('flex flex-col overflow-auto', className)}
+ aria-label={label}
+ aria-multiselectable="false"
+ role="tree"
>
{children}
</RovingTabindexRoot>
</TreeViewContext.Provider>
)
}-
We add a
labelprop to ensure that our screen reader can announce what our tree generally contains+ label: string -
and then we set
aria-multiselectableandroleto indicate that you can only select one node at a time and that this is a tree.
Node
export const Node = function TreeNode({
node: { id, children, name },
}: NodeProps) {
/* ... */
return (
<li
{...getRovingProps<'li'>({
/* ... */
+ ['aria-expanded']: children?.length ? Boolean(isOpen) : undefined,
+ ['aria-selected']: selectedId === id,
+ role: 'treeitem',
})}
>
{/* ... */}
{children?.length && isOpen && (
- <ul className="pl-4">
+ <ul role="group" className="pl-4">
{children.map(node => (
<Node node={node} key={node.id} />
))}
</ul>
)}
</li>
)
}For our Node
-
We set
aria-expandedonNodes that contain children.children?.length ? Boolean(isOpen) : undefinedOur ternary statement is based on
children?.length, which I am using to determine if children exist.If
children?.lengthis truthy, then I want to coalesce isOpen to a boolean with the Boolean constructor since it is initially undefined.Otherwise, I can return undefined to prevent the property from being set.
-
We set
aria-selectedbased onselectedId -
And we set
role: 'treeitem'to identify this as an item in our tree.
import { useState } from "react";

import { Treeview } from "./treeview"
import { data } from "./data"

export default function App() {
    const [selected, select] = useState<string | null>(null)
    return (
        <Treeview.Root
            value={selected}
            onChange={select}
            className="w-72 h-full border-[1.5px] border-slate-200 m-4"
        >
            {data.map(node => (
                <Treeview.Node node={node} key={node.id} />
            ))}
        </Treeview.Root>
    )
}
What I learned
Initially, when I implemented the keybindings for this treeview I stored the tree structure/relationships in context. To create a keybinding for the "next" node I created a tree traversal for finding the post-order next node. This was complex, and the idea of writing the blog post to explain it all was daunting.
You can imagine my surprise when the roving tabindex pattern Radix uses worked out of the box so nicely.
The DOM APIs can be daunting, but using them can dramatically simplify your code. Hopefully, in future posts, I'll be able to demystify more of them as I learn.
I hope you learned something from this post — it's been fun to compile. Check out part 3, to see how easy animating layout is with Framer Motion.
Love hearing feedback so if you have any .